
 Bookmark
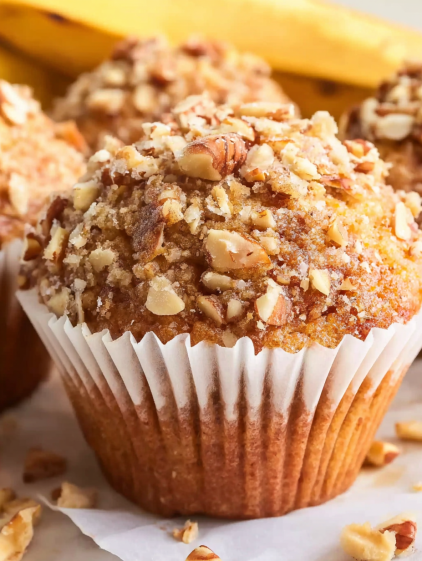
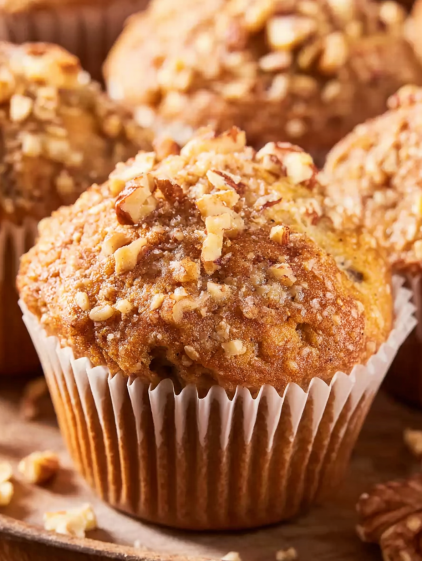
These banana nut muffins come together in no time thanks to cake mix and a handful of simple ingredients, making them perfect for a busy morning or a sweet afternoon treat. The trick is using butter pecan cake mix, which gives the muffins a rich, nutty depth and tender crumb. I love how one bowl, a few ripe bananas, and a shower of chopped walnuts create bakery-style muffins your whole house will smell amazing.
The first time I made these, I had bananas on the counter and not quite enough energy for from-scratch baking. The cake mix shortcut worked so well that now my family requests these muffins for road trips and quick breakfasts.
Ingredients
- Butter pecan cake mix: Gives incredible nutty flavor and saves time. If not available, you can use yellow or white cake mix for a milder taste
- All purpose flour: Helps strengthen the batter and gives a true muffin texture instead of cake. Look for unbleached flour for the best crumb
- Baking powder: Gives extra lift and makes the muffins domed and fluffy. Use fresh baking powder to guarantee rise
- Large ripe bananas: Add moisture and natural sweetness. The more brown speckles, the sweeter and more banana-forward your muffins will taste
- Large eggs: Help bind the batter so the muffins hold together. Room temperature eggs mix in more smoothly
- Walnuts: For crunch and classic banana nut flavor. Fresh walnuts will give you the best texture. You can use pecans or almonds if preferred or leave the nuts out for a softer bite
Instructions
- Preheat and Prep:
- Set your oven to 350 degrees Fahrenheit. Grease or line two standard muffin pans. This keeps the muffins from sticking and makes removal effortless.
- Mix Dry Ingredients:
- In a large mixing bowl, combine the butter pecan cake mix, all purpose flour, and baking powder. Whisk until everything is fully blended. Even mixing here ensures every bite bakes up with the right texture.
- Add Wet Ingredients:
- Add mashed ripe bananas and large eggs to the dry mixture. Toss in one cup of chopped walnuts if using. Stir everything together just until you see no dry streaks. Overmixing can make the muffins tough.
- Fill Muffin Tins:
- Use a scoop or spoon to portion batter into the prepared muffin pans filling each cup about two thirds full. This helps the muffins rise tall without spilling over.
- Top and Bake:
- Sprinkle remaining chopped walnuts over the tops for extra crunch and bakery style finish. Place the muffin tins on the middle oven rack. Bake for 17 to 20 minutes or until golden brown and a toothpick comes out clean from the center.
- Cool:
- Allow muffins to cool in the tins for five minutes before removing them. This helps set the crumb and keeps them intact. Serve warm or let cool completely on a rack for storage.
Walnuts are my absolute favorite to mix into banana muffins because of the way they toast up in the oven and add pops of crunch in every bite. I remember making a double batch for my kids before a camping trip and barely any made it to breakfast they are that tempting warm from the oven.
Storage Tips
After baking, let muffins cool completely before storing. Keep them lightly covered at room temperature for up to five days. If you refrigerate, protect them from drying out by wrapping in foil or a zip top bag. For longer storage, freeze muffins in a single layer then transfer to a resealable freezer bag. Defrost at room temp or warm in the microwave for best texture.
Ingredient Substitutions
You can swap butter pecan cake mix with yellow or white for a lighter taste or chocolate if you want richer banana chocolate muffins. Pecans or almonds make great alternatives to walnuts and for a nut free version, just leave them out. Stir in a handful of chocolate chips for a new spin or add a pinch of cinnamon for a cozy spiced kick.
Serving Suggestions
Enjoy muffins warm with a pat of butter at breakfast or serve with coffee or tea for a midday snack. These also pair well with Greek yogurt and berries for a more filling start or tuck into school lunchboxes for a boost of homemade comfort.
Cultural and Seasonal Notes
Banana nut muffins are a classic American bake sale treat and a smart way to use up bananas before they go to waste. While they taste great year round, they are especially handy in summertime when bananas ripen fast or during the holidays when you need a quick addition to a brunch spread.
Seasonal Adaptations
Swap walnuts for pecans or hazelnuts for a festive autumn twist. Add dried cherries or cranberries in holiday months. Top with a light dusting of powdered sugar or a maple glaze for a winter treat.
Success Stories
My neighbor tried this recipe with pecans and mini chocolate chips and the muffins vanished at her work potluck. Another friend made a double batch to freeze for busy school mornings and said her kids loved microwaving them for breakfast.
Freezer Meal Conversion
These muffins freeze beautifully. Let them cool completely then freeze in a single layer before moving to a freezer bag. Take out only what you need and thaw overnight or pop them in the microwave for about 20 seconds for a homemade treat anytime.
Homemade banana nut muffins are a comforting classic you can make anytime with just a few shortcuts. Bake a batch and brighten up your morning or share with family and friends.
Common Recipe Questions
- → What cake mix works best for these muffins?
Butter pecan cake mix brings an extra layer of rich, nutty flavor, but white or yellow cake mix can also be used for a milder taste.
- → Can I add other ingredients to the batter?
Yes, try chocolate chips, raisins, other chopped nuts, or a sprinkle of cinnamon or nutmeg for additional flavor options.
- → How do I know if my bananas are ripe enough?
Look for yellow bananas with brown speckles. The riper they are, the sweeter and more pronounced the banana flavor will be.
- → Why add flour and baking powder to the mix?
Extra flour helps hold the muffins together, while baking powder creates fluffy, tall muffins with perfect crumb texture.
- → How do I store these muffins for best freshness?
Store cooled muffins lightly covered at room temperature for up to 5 days, or freeze for up to 2 months. Reheat before serving if desired.